
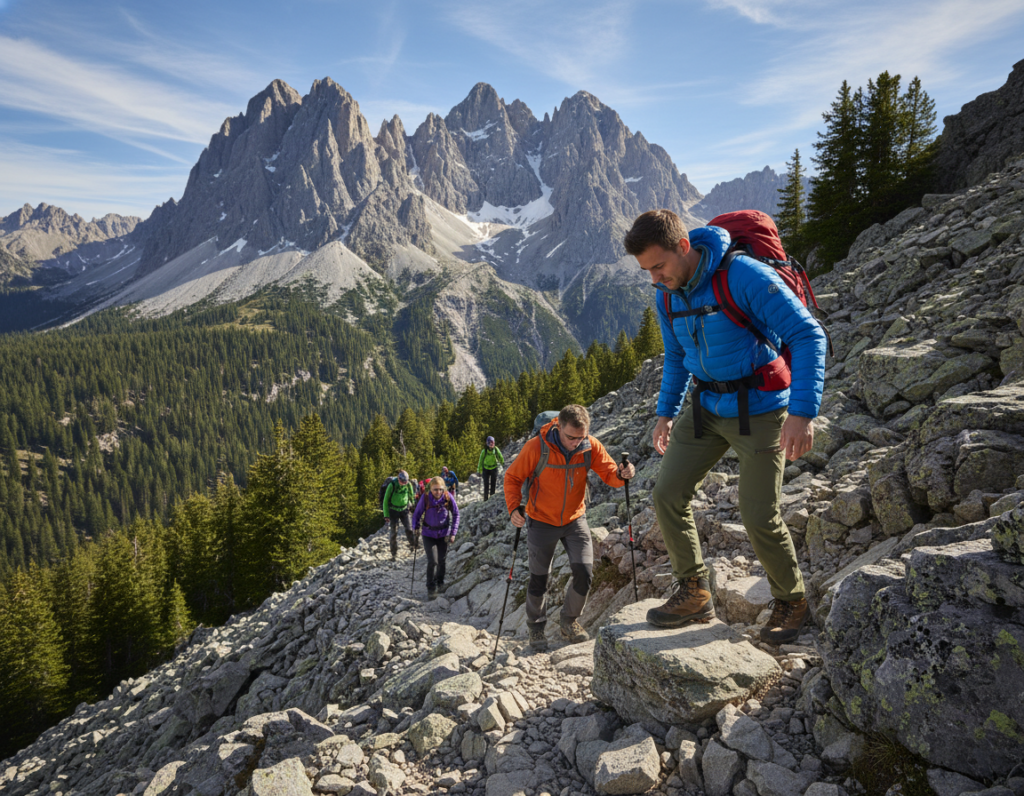
Your legs are already buzzing from the climb, and now every step down feels like a battle with gravity. That triumphant summit feeling can quickly fade when you face the long, steep path back to the trailhead.
It might surprise you, but research shows a staggering 80% of accidents occur on the descent. We often train hard for the uphill grind, treating the return trip as an afterthought. This oversight explains why slips and falls happen far more frequently on the way down.
This guide shares the same techniques used by seasoned mountaineers to move downhill efficiently. These methods protect your knees and significantly reduce your risk of injury. Mastering a few simple skills can transform a painful, nerve-wracking experience into a confident and controlled part of your adventure.
Whether you’re tackling a local peak with significant elevation loss or planning a multi-day trek, these practical tips will help. They are based on proven biomechanical principles, not superhuman athletic ability. You’ll learn to distribute your weight properly and move with greater comfort and control on any mountain path.
Staying safe also means being prepared for other conditions, like knowing how to avoid heat stroke while hiking when temperatures rise.
Key Takeaways
- Most hiking accidents happen during the downhill portion of a trip.
- Descending requires different muscles and techniques than ascending.
- Proper technique focuses on a low center of gravity and bent knees.
- Shortening your stride improves stability and control on steep trails.
- Learning these skills reduces injury risk and increases overall comfort.
- Anyone can apply these principles for a safer, more enjoyable experience.
Understanding the Impact of Steep Descents
While we often focus on reaching the summit, the return trip demands a completely different set of physical adaptations. Many adventurers find the journey down more challenging than the climb up. This isn’t just perception—it’s physics and physiology working against you.
Effects on Joints and Muscles
Each step downhill sends impact forces through your entire body. Your ankles, knees, and hips absorb this shock repeatedly. The quadriceps in your front thighs work constantly to brake your descent.
Most people train their climbing muscles more than their braking muscles. This creates a strength imbalance. On long trails with significant elevation loss, this repetitive stress accumulates quickly.
Your knees bear particularly high loads as they bend to control each step. This explains why many people feel fine at the summit but struggle on the return journey.
The Role of Gravity and Momentum
Gravity pulls you downward with increasing force during descent. Your body mass multiplied by acceleration creates work that your legs must absorb. This constant braking action keeps muscles tense and leads to fatigue.
Momentum can accelerate your pace beyond what feels comfortable. You find yourself fighting to maintain control. Understanding these forces helps explain why proper technique matters so much for protecting your body on steep trails.
Preparing Physically and Mentally for Downhill Hiking
A successful descent begins long before you take your first step downhill. Smart physical preparation is your best defense against fatigue and injury. You’ll want to focus on building the specific strength your body needs for this task.

Strengthening Your Legs and Core
Your climbing muscles get a workout on the way up. But your descending muscles need dedicated training. Focus on exercises that mimic the motion of stepping down.
Key movements build the necessary leg strength and protect your knees. Your core is just as important for stability.
- Step-Downs: Practice stepping down from a low platform. This directly trains the muscles used for braking.
- Squats and Lunges: These exercises build power in your quads, glutes, and hamstrings. Perform lunges with a slow, controlled lowering phase.
- Core Work: A strong core stabilizes your spine. It prevents your upper body from leaning too far forward or back.
Balance training is also crucial. Every step on a trail shifts your full body weight to one leg.
Building Endurance for Extended Descents
Strength is vital, but so is stamina. A long downhill section can last for hours. Your muscles need to perform repeatedly without giving out.
Start your training plan well ahead of your adventure. For a major trek, allow 3 to 9 months. Begin with bodyweight exercises and gradually add resistance.
This progressive approach builds endurance safely. Your muscles will thank you when you’re navigating that final mile with confidence.
Controlled Descents Hiking: Mastering Downhill Technique
The real skill of mountain travel often reveals itself not on the climb up, but in the graceful, deliberate movement down. Let’s break down the key principles that guide experts on steep terrain.
Taking Smaller, Fast Steps
Replace long, reaching strides with quick, compact steps. This simple change is the foundation of stability. Smaller steps keep your center of gravity directly over your feet.
You maintain better balance and control. If a foot slips, recovery is much easier. Your muscles absorb the impact instead of your joints, protecting your knees.
Maintaining a Low Center of Gravity
Bend your hips and knees, lowering your body’s center. Think of an athletic stance. This might feel awkward at first, but it provides superior stability.
Avoid leaning back away from the slope. It feels safer but reduces traction. Keep your weight over your boots. A good mental cue is “nose over toes.”
Proper Foot Placement and Body Alignment
Scan the trail ahead for stable spots. Place each foot with intention. On firm surfaces, plant your entire foot flat for maximum grip.
On loose terrain like gravel, angle your feet across the slope. Use your boot edges for traction. For very steep sections, turn sideways and sidestep down.
This reduces the strain on your ankles. A natural zig-zag pattern can also make the angle feel less severe. Constant focus on where you step prevents most slips.
Essential Gear and Equipment for Safe Descents
Smart gear choices provide the stability and support your body needs when gravity takes over. The right equipment setup transforms challenging downhill sections into manageable, confident movements.

Choosing the Right Trekking Poles
Trekking poles redistribute your body weight to your arms and shoulders. This reduces stress on your knees and legs during steep sections.
Lengthen your poles for downhill travel. Proper length prevents reaching forward, which disrupts your center of gravity. These tools provide two extra contact points for better balance.
Adjusting Footwear and Backpacks
Tighten your boot laces before descending. This prevents your foot from sliding forward inside the boot. Proper fit reduces toe jamming and blister risk.
Secure your backpack’s hip belt and shoulder straps snugly. A stable pack minimizes movement that can throw off your balance. Carry the lightest load possible to reduce joint stress.
| Gear Item | Uphill Adjustment | Downhill Adjustment | Key Benefit |
|---|---|---|---|
| Trekking Poles | Shorter length | Longer length | Better weight distribution |
| Boot Laces | Comfortable fit | Tighter fit | Prevents foot sliding |
| Backpack Straps | Balanced weight | Snug fit | Reduces sway |
| Pack Weight | Heavier uphill | Lighter downhill | Less joint impact |
Pay attention to your footwear’s sole material. Some trail runners have poor wet traction that becomes slippery on damp surfaces. Small preparation details make a big difference in comfort and safety.
Adapting Your Technique to Varied Terrain
As you encounter different surfaces on your way down, your strategy must adapt to maintain stability. What works on packed dirt often fails on loose rock or slippery snow. Each type of ground demands specific footwork and body positioning.
Navigating Rocky or Scree Slopes
Loose rock surfaces like scree require very short steps. These “baby steps” help you monitor your momentum carefully. The ground shifts unpredictably beneath your weight.
Angle your feet across the slope rather than pointing straight down. Use your boot edges for better traction. Always give space to people below you in case rocks dislodge.
On solid rock, keep your entire boot sole flat against the surface. This maximizes rubber contact for superior grip. Move deliberately from one stable spot to the next.
Descending on Snow and Uneven Surfaces
Snow conditions change throughout the day. Firm morning snow allows confident steps, while afternoon slush requires caution. Your technique must adjust accordingly.
Drive your heels in aggressively with each step on loose surfaces. Being assertive provides better control than tentative movements. This works well for gravel, loose soil, and snow.
For very steep sections, consider sidestepping or even sitting to scoot down. Safety always comes before style. Sometimes the smartest move is the simplest one.
| Terrain Type | Best Technique | Key Focus | Common Mistake |
|---|---|---|---|
| Scree/Rock | Short steps, angled feet | Momentum control | Long strides |
| Snow | Heel-first steps | Aggressive placement | Tentative footing |
| Wet Rock | Flat foot placement | Maximum surface contact | Quick movements |
| Loose Soil | Heel digging | Stability creation | Light steps |
Remember that conditions can change quickly during your day on the trail. Stay observant and adjust your approach as needed. The right technique makes all the difference for a safe, enjoyable experience.
Conclusion
Finishing a hike strong means having energy left when you reach the trailhead, not just when you stand on the summit. Remember that your adventure is only halfway complete at the top—the real challenge often comes during the return journey.
The techniques we’ve covered become second nature with practice. Smaller steps and proper weight distribution protect your knees and reduce injury risk. You’ll move with better balance and greater comfort on any terrain.
Start incorporating these methods into your local trail outings now. Building muscle memory takes time, but the payoff is huge. You’ll finish each trek feeling accomplished rather than exhausted, ready for your next mountain adventure.
