
Can you shave ounces from your pack without making the trip miserable?
I’ve tested shelters, sleeping bags, and cook systems so you don’t have to guess. Modern ultralight gear and smarter planning let you cut base weight while staying warm and rested.
Start by focusing on the Big Three: tent, sleep system, and pack. Choose multi-use items, weigh everything, and plan water and food around reliable sources on the trail.
This short guide shows simple swaps, real brand examples, and a repeatable system for every day in the backcountry. You’ll learn realistic targets — under 15 lb base is a strong goal — and when a small comfort item like a chair makes sense.
Key Takeaways
- Focus on the Big Three to cut the most weight fast.
- Use multi-use gear and weigh items before each trip.
- Plan water and food to avoid carrying extra ounces.
- Set a base weight target and track it with a simple list.
- Choose tested gear from trusted brands to balance comfort and weight.
What this lightweight backpack packing guide covers
Here’s what this checklist includes, and how it helps you pack for a weekend or 3–5 day backpacking trip.
You’ll get a clear kit list you can print and review each time you pack. The checklist fits a typical 50–60L pack for most 3–5 day trips. Many hikers prefer water bottles over a hydration reservoir for easier refills on trail.
- A step-by-step kit overview for weekend and longer backpacking trips, plus a printable list to use every time.
- Definitions of base weight, typical pack sizes, and how much time to budget for weighing gear and dialing in your load.
- Which items are essential, which are optional, and which are nice‑to‑have so you can tailor weight to goals.
- Practical notes and short review points on popular gear to help you choose faster.
- Coverage of water, food, clothing, rain protection, pants and sun protection, plus when to carry a paper map as backup.
| Pack Capacity | Trip Length | Typical Use |
|---|---|---|
| 50 L | 2–4 day | Weekend kit, moderate gear |
| 60 L | 3–5 day | Extra food or cold-weather layers |
| 70 L | 5+ day | Extended trips or group gear |
Expect a simple workflow: plan, weigh, pack, test, then refine after your first day on trail. I use this routine myself and it saves time and surprises on the route.
Mindset shift: pack light without losing comfort
A small shift in how you think about weight turns slow hikes into easier days on the trail.
Cutting ounces is a process, not a contest. Many hikers find a sweet spot under 15 lb base; under 10 lb is true ultralight for those who want it.
Start small. Commit to one change each trip so your load drops steadily. You will keep comfort where it matters: sleep and warmth.
- Think balance, not bragging rights: aim to stay warm, fed, and happy while hiking.
- Trim items that duplicate tasks; keep the gear that earns its place every night.
- Try a stoveless approach only on short trips — it can save 1–2 lb, but a hot drink can be worth the ounces.
- Use the trail as your teacher: after each trip list what you didn’t use and what made a difference.
- Accept personal limits: fitness, terrain, and trip goals shape your ideal pack and weight.
Don’t chase extremes. Build a system you’ll want to carry season after season. That consistency makes lighter feel easier and more fun.
Dial in the Big Three: tent, sleeping bag or quilt, and backpack
Nail the core trio — shelter, sleep insulation, and the carry system — and the rest falls into place. Your choices here shape comfort, warmth, and how much gear you want to carry on trail.
Ultralight tents and trekking pole shelters
Trekking‑pole shelters like the Zpacks Duplex or Triplex cut tent weight to roughly 1–2 lb for the body. Expect a short learning curve for pitch and guyline tension.
Practice at home so rain and wind don’t slow you on the trail. Factor stakes and guylines into the shelter system weight when you compare options.
Sleeping bags vs quilts and pad pairing
Quilts (for example, Enlightened Equipment Revelation) often save ounces and feel roomier if you move at night. Pair a quilt with a quality sleeping pad for warmth.
Prioritize a pad with real insulation and about 3+ inches thickness. The NEMO Tensor All‑Season Insulated hits that balance at roughly 1 lb and boosts sleep quality.
Backpacking pack fit, capacity, and realistic load limits
Fit your backpacking pack to your torso length and pick capacity that matches trip length; 50–60L covers most weekend to short multi‑day trips. Keep total pack weight under ~30 lb for comfort; over 35–40 lb gets tiring fast.
- Target 7–8 lb combined for the Big Three for a strong ultralight baseline; aim under 10 lb when starting out.
- Use a stuff sack as a pillow if needed, but prioritize good sleep over obsessive ounce-cutting.
- Mini review tip: include stake and guyline weight when comparing Dyneema tents like Duplex/Triplex.
| Component | Example | Weight (approx.) | Notes |
|---|---|---|---|
| Shelter | Zpacks Duplex / Triplex | 18–34 oz (system ~2 lb) | Trekking‑pole pitch; needs practice; rain capable |
| Sleep insulation | Enlightened Equipment Revelation / Accomplice | 19–48 oz | Quilts save weight; check temperature rating |
| Sleeping pad | NEMO Tensor All‑Season Insulated | ~16 oz | 3.5″ thickness; real R‑value for comfort |
| Pack | 50–60L framed pack | Varies (aim: carry ≤30 lb) | Fit to torso; capacity for trip length |
Choose multi-use gear to cut duplicate items
Smart multi-use choices let you carry fewer items while staying practical on trail. I use simple swaps that save ounces and make camp faster to set up.
Everyday swaps that work
Make one item do two jobs. A cook pot doubles as a bowl and can collect water in a pinch. Your phone can handle navigation, photos, and notes; tuck a paper map in case of signal loss.
Camp tools pulled from your kit
- Use trekking poles as tent poles on compatible shelters to drop bulk and simplify rigging.
- Fill a sleeping bag stuff sack with clothes to make a comfy pillow—no extra bags needed.
- Wrap a few feet of duct tape around a trekking pole or bottle for quick repairs and blister patches.
- Carry narrow Smartwater or soft bottles instead of heavy steel to cut pack bulk as you drink.
Ask, “What else can this do?” for every piece of gear. Fewer items mean less to track, less set up, and less overall weight on your next backpacking trip.
Weigh every ounce and track your base weight
Start by weighing every piece so the true load stops hiding in the corners of your kit. Use a bathroom or luggage scale and write each item’s weight in ounces. That first pass reveals obvious targets for swaps.
I keep a simple spreadsheet with columns for item, weight, category, and a quick review note on comfort or reliability. Sorting by heaviest categories helps me see where to focus time: the Big Three, sleeping pad, and stove system usually show the biggest wins.
Scales, spreadsheets, and smart swaps
- Don’t guess—know: weigh every single piece and record it in a list so weight stops hiding in pockets.
- Right‑size fuel: a 3.5 oz fuel canister often covers 1–2 nights of boiling water for coffee and meals.
- Small systems add up: HydroBlu Versa Flow + CNOC Vecto reservoir weigh ~4.8 oz together and can beat bulk filters.
- Use a mini review in your sheet—note comfort so you don’t trade warmth for grams you’ll regret.
- Schedule time before each trip to re‑weigh changes and track cumulative savings across trips.
| Item | Example | Notes |
|---|---|---|
| Fuel | 3.5 oz canister | Enough for 1–2 nights boiling water |
| Filter | HydroBlu Versa Flow + CNOC Vecto | ~4.8 oz combined; handy for short trips |
| Pad swap | Smaller insulated pad | Quick comfort win; saves noticeable ounces |
Smart water and filtration: carry less, drink more
A smart water plan lets you carry less weight and still stay hydrated on long days. Start by checking recent trail reports or calling the ranger so you know which sources are flowing right now. That simple step often saves liters and miles of extra effort.
Researching sources before you hike
Plan to carry only enough to reach the next reliable spring or creek. In dry seasons, expect gaps and add a safety margin. I always mark sources on my map and recheck updates the night before a trip.
Filters, gravity systems, and tablets
Choose a fast, light system. The HydroBlu Versa Flow paired with a CNOC Vecto weighs about 4.8 oz and works as a squeeze or gravity setup. It backflushes easily and saves time at camp.
Bottles, reservoirs, and distributing weight
For most backpacking routes I favor bottles over a bladder. Bottles refill quicker at a stream and don’t require you to unpack your pack. Aim for ~3L capacity total and split liters across two or three smaller bottles to balance side-to-side weight.
- Skip heavy steel and bulky Nalgenes; Smartwater or soft bottles are light and fit side pockets.
- Keep your filter accessible so you filter when you stop, not later when you’re tired.
- Quick review: hang a Vecto bag in camp and use gravity—clean water flows while you set up tent and cook.
| Component | Example | Why it works |
|---|---|---|
| Squeeze/Gravity | HydroBlu Versa Flow + CNOC Vecto | ~4.8 oz; squeeze or hang for gravity; easy backflush |
| Rigid bottle | Smartwater (1L) | Light, stiff, side-pocket friendly for quick refills |
| Soft bottle | Soft collapsible 1L | Compresses as you drink; saves space in pack |
| Reservoir | 1.5–2L bladder | Good for big day hikes; slower to refill at stream |
Food strategy for ultralight trips
A simple food plan saves ounces, time at camp, and the headache of last‑minute swaps.
Lay out daily meals before you start packing. Make piles for breakfast, lunch, dinner, and snacks so you can see what you’ll actually carry. This cuts waste and keeps your pack lighter on day one.
Calorie‑dense meals, dehydrated options, and repackaging
Choose calorie‑dense foods and dehydrated meals to get more energy per ounce. Repackage portions into sturdy freezer bags or single‑serve bags so you boil only what you need.
- Plan by the day — saves time and prevents overpacking.
- Use nuts, powdered milk, and dehydrated dinners to boost calories without bulk.
- Repackage into freezer bags; add hot water and eat from the bag to cut dishes and trash.
Fuel canister sizing and when to go stoveless
For two people on a 3–5 day outing, one 8 oz canister often covers boiling water for coffee and dinners. Skip the stove on 1–2 night trips when weather is warm; cold‑soak oats and use instant coffee.
Cold‑soak coffee and breakfast hacks
Cold‑soak instant oats or couscous the night before for a no‑heat breakfast. Instant coffee packets make a fast wake‑up and save fuel and time in camp.
| Component | Example | Why it works |
|---|---|---|
| Fast boil stove | Jetboil Flash | Quick boils; saves fuel and time |
| Minimal stove | PocketRocket + TOAKS pot | Versatile for cooking from scratch |
| Stoveless | Cold‑soak meals | No fuel needed; cuts weight |
Mini review: a Jetboil is great for fast coffee and dinners. If you cook complex meals, a small stove and pot set gives flexibility. Pack a “start eating first” bag with heavy first‑day items so your load lightens quickly on the trail.
Clothing and layering: bring less, stay comfortable
Good clothing choices cut weight and make both day miles and camp more comfortable. Pack one hiking outfit and a separate dry set for camp and sleeping. That split keeps you fresh at night and makes your sleeping bag or quilt work better.
Hiking outfit vs camp/sleep system
Wear moisture‑wicking shirts and quick‑dry pants on the trail. Change into a dry base layer and synthetic insulation at camp. I use an Enlightened Equipment Torrid top as a reliable midlayer when damp; it stays warm and packs small.
Quick‑dry fabrics, rain gear, and insulating layers
A light rain jacket is worth its ounces—storms come fast. Choose merino or synthetic layers and avoid cotton. These fabrics dry fast after a rinse and reduce overall weight in your kit.
Socks, underwear rotation, and sun protection
Bring two pairs of socks and 2–3 underwear. Rinse items on the trail and dry them folded on your pack. Add a wide‑brim hat and quality sunglasses to cut sunscreen needs and protect skin on long hikes.
| Item | Example | Why it works |
|---|---|---|
| Hiking shirt | Merino or synthetic tee | Manages sweat; resists odor |
| Camp midlayer | Enlightened Equipment Torrid | Warm when damp; compresses small |
| Rain shell | Light waterproof jacket | Protects skin and kit; saves energy |
| Socks & underwear | 2 pairs socks, 2–3 underwear | Rotate and rinse to reduce carried weight |
Safety, first aid, and emergency items that always go
A compact set of emergency items gives you confidence on any route. I pack the essentials in a single quick‑access pocket so I can reach them without digging at dusk or in wind.
Carry a compact first aid kit tailored to your group. Top it with blister tape, any personal medications, and a few hygiene wipes for basic cleaning before you eat.
Core items to always carry
- GPS communicator (Garmin inReach Mini 2) for two‑way text and SOS when cell service fails.
- Reliable headlamp (for example, BD Spot) with fresh batteries and a backup lighter even if your stove has ignition.
- Purification tablets as a light backup to your primary filter for unexpected water issues.
- Small first aid kit with blister care, bandages, and tweezers; add personal prescriptions.
Do a quick pre‑trip review of your emergency plan: who you’ll contact, bail‑out routes, and likely water sources in dry seasons. Resist trimming true safety gear to save weight. If you must cut ounces, remove duplicate comfort items instead.
| Item | Purpose | Why carry |
|---|---|---|
| Garmin inReach Mini 2 | Comm & SOS | Two‑way messaging and global SOS |
| Headlamp + lighter | Light & fire | Reliable after dark and backup ignition |
| First aid + wipes | Treat wounds | Stops infection; manages blisters |
Organize your backpacking kit for speed and simplicity
When every minute counts, an organized kit turns chores into quick habits. A small bit of prep saves a lot of time at camp and on trail.
Packing sacks, pocket systems, and a master gear list
I lay everything out before loading my pack and keep a master list with exact weights. That list helps me spot heavy items I rarely use.

- Use a color-coded sack system so you can grab what you need without dumping your whole pack.
- Pre-stage bags by pocket: water treatment one side, snacks the other, rain jacket up top, hat/gloves in the lid.
- Store your sleeping pad and shelter where they’re easy to reach so setup starts fast in rain.
- Carry water bottles in side pockets for quick refills — they beat a buried reservoir in camp.
- Give each essential a “home” and always return it there to save time and prevent lost gear.
- Keep heavy items close to your spine and centered for stable weight on the move.
| Item | Location | Why |
|---|---|---|
| Shelter | Bottom or lash-on | Quick access for wet camps |
| Sleeping pad | Top or exterior | Fast setup and drying |
| Water bottle | Side pocket | Easy refills and balance |
End each trip by updating your list and removing sacks you never touched. That habit trims excess and speeds future trips.
Backcountry hygiene and Leave No Trace packing
Small, deliberate hygiene choices make a big difference for fellow hikers and the environment.
Build a simple poop kit: a light trowel, a roll of toilet paper sealed in a zip bag, and hand sanitizer. Pack out used paper in a separate sealable bag so animals don’t spread it around. Use unscented products to avoid attracting critters.
Toilet items, pee rags, and wipes
A reusable pee rag like the Kula Cloth is a clean, low‑waste option between water sources. It cuts trash and dries quickly. Body wipes are handy for hands and hotspots—bring only the number you’ll use, they aren’t a shower substitute.
- Build a poop kit: trowel, paper, sealable bag, hand sanitizer.
- Pack out all paper; leave no trace on the trail.
- Kula Cloth or similar pee rag reduces waste and adds comfort.
- Limit wipes to actual needs; store them with other hygiene items.
- Consider a small portable bidet to cut paper on longer backpacking routes.
- Keep hygiene kits away from food and first aid bags in clean, accessible storage.
- Use a little water for quick rinses and follow Leave No Trace disposal rules.
| Item | Why | Notes |
|---|---|---|
| Trowel | Dig catholes | Light, durable metal or plastic |
| Seal bag | Pack out paper | Double‑bag for odor control |
| Pee rag / wipes | Clean, cut waste | Unscented; wash and dry between trips |
Optional luxury items that still keep weight low
Some thoughtful luxuries repay their few ounces with better sleep and faster recovery on trail. Add one item, test it, and note how it changes your energy the next day.
I carry a small pillow when I need extra neck support. The Therm‑a‑Rest Compressible Pillow packs small and really improves sleep. If you wake stiff, a pillow often pays back its weight in morning comfort.
Consider a compact chair if you linger at camp. A 1‑lb Helinox Chair Zero gives real comfort for minimal weight. It fits well on longer stops or group evenings.
A tiny quick‑dry towel is handy for dishes or a swim. Choose the smallest size that works so it dries fast and stows easily.
For power, a Nitecore 10,000 mAh bank (~5.29 oz) keeps phones and headlamps alive. Put luxuries near the top of your pack so you actually use them and don’t carry unused items all day.
| Item | Approx. Weight | Primary Benefit | When to Bring |
|---|---|---|---|
| Helinox Chair Zero | ~1 lb | Seated comfort at camp | If you sit and cook or read in camp |
| Therm‑a‑Rest Pillow | ~3–5 oz | Better neck support and sleep | If you wake with stiffness |
| Quick‑dry towel | ~2–4 oz (small) | Dish drying and swim use | Trips with water access or swim stops |
| Nitecore 10,000 mAh | ~5.29 oz | Charge phone/headlamp | Multi‑day trips with electronics |
Sample ultralight kit for weekend backpacking trips
Use this weekend kit as a starting point to tune weight, sleep comfort, and camera needs for short trips. The list below fits warm‑season outings and lets you choose a stove or go stoveless depending on time and taste.
Warm-season kit with and without a stove
Stove setup: 50–60L backpack, trekking‑pole Zpacks shelter, Revelation quilt (≈19–26 oz), and a NEMO Tensor All‑Season pad (~1 lb). Add a Jetboil Flash (13.1 oz) and one right‑sized canister where quick boils matter.
Stoveless option: skip the Jetboil, bring instant coffee and cold‑soak breakfasts. Save ounces and time by using purification tablets or a small HydroBlu Versa Flow + CNOC Vecto (~4.8 oz) for water.
Photographer-friendly adjustments for cameras and tripods
If you carry a mirrorless body, a lens, and a compact tripod, drop the stove and replace the filter with tablets for short backcountry trips. That swap frees weight for camera gear while keeping safety and water plans intact.
- Food: two days of calorie‑dense meals, repackaged into small bags.
- Safety: compact first aid, headlamp, lighter, and a GPS communicator.
- Comfort: Helinox Chair Zero (~1 lb) and Therm‑a‑Rest Compressible Pillow if you want extra rest.
| Component | Example | Approx. Weight | Notes |
|---|---|---|---|
| Shelter | Zpacks Duplex / Triplex | ~18–34 oz (system) | Trekking‑pole pitch; roomy for two |
| Sleep system | Enlightened Equipment Revelation + NEMO pad | Quilt 19–26 oz; pad ~16 oz | Good warmth-to-weight for warm nights |
| Water & Cooking | HydroBlu + CNOC; Jetboil or stoveless | ~4.8 oz filter; Jetboil 13.1 oz | Squeeze/gravity filter or instant coffee to save fuel |
Weather, terrain, and season planning for the United States
Season and terrain shape every choice you make before you step onto a trail. Check recent reports and local ranger notes for current conditions. In the mountains, skies can clear by noon and freeze at night.
Rain, cold nights, bugs, and canister rules
Always expect rain even if the forecast looks fine. Carry a reliable rain jacket and rehearse a quick tent pitch so you stay dry when storms pop up.
Verify local bear canister rules. In places like the Sierra Nevada, canisters are mandatory. Plan pack space and balance—canisters change how gear and food fit in your system. Many parks rent canisters if you don’t want to carry one from home.
Bug season matters. Bring a head net and pick camps with breeze or higher elevation to cut bites. For dry years, map your water sources carefully and carry a dependable filter as backup.
- Check seasonal norms and recent reports before you go.
- Match your quilt or bag and pad to expected lows and ground conditions.
- Share your itinerary and carry a GPS communicator for emergencies on backcountry routes.
| Factor | What to do | Why it matters |
|---|---|---|
| Weather | Check forecasts + trail reports | Prepares you for rapid change |
| Canister | Confirm rules; rent if needed | Protects food and follows regulations |
| Water | Plan for dry spells; bring filter | Avoid long carries and dehydration |
| Bugs & cold | Head net + warmer pad/quilt | Comfort and safer sleep |
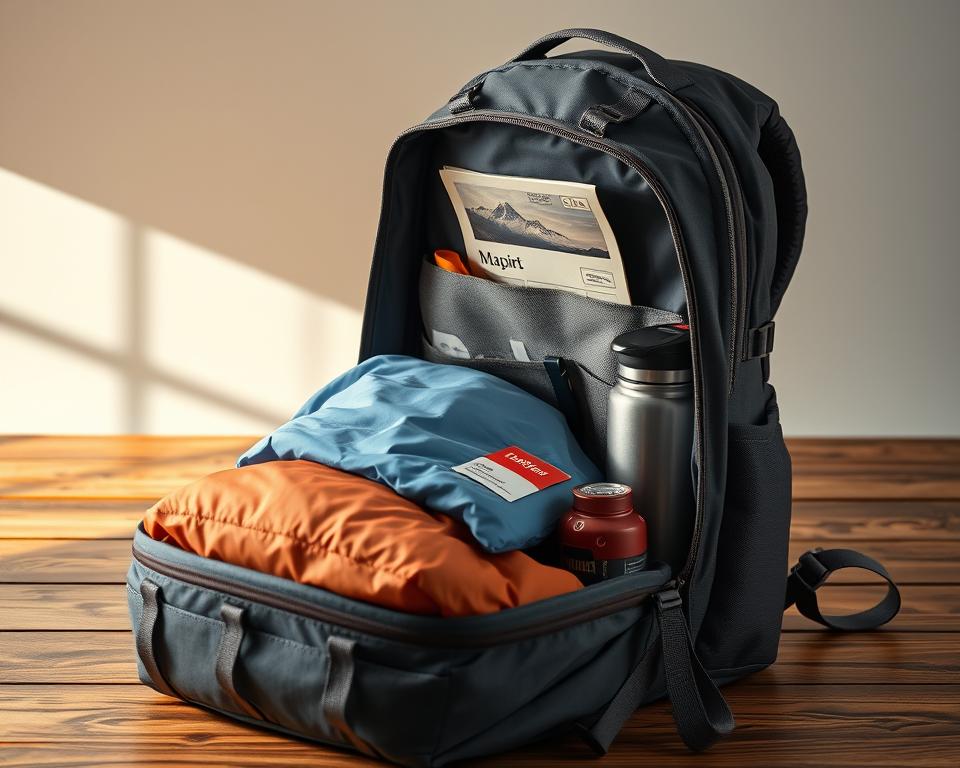
lightweight backpack packing guide: how to pack it right
How you arrange gear inside the pack changes comfort and hours on trail more than any single swap. A clear order speeds setup, protects your sleep system, and keeps heavy items close to your spine where they belong.

Top, core, and bottom: a practical packing order
Bottom: pack your sleeping bag and sleeping pad first in a dry sack so the sleep system stays dry. This protects insulation if rain soaks the outer shell later.
Core: place dense weight—food, canister and cooking kit, and shelter—tight against your spine. Centering those items stabilizes the load and reduces sway on steep terrain.
Top: keep the tent body or rain jacket near the top for instant access. When storms hit, you can pitch or layer up in seconds instead of digging through the main compartment.
Balancing weight, quick access, and trail‑time efficiency
- Sides: carry water bottles in reachable side pockets so you refill without unpacking; balance liters across both sides.
- Outside: lash trekking poles, a wet rainfly, or a drying towel externally to avoid wetting the sleeping sack.
- Pockets: stash snacks, sunscreen, map/phone, and a small first‑aid pouch in hip or lid pockets for fast trail use.
- Adjust: tighten hipbelt and load lifters after an hour; small tweaks save discomfort and wasted time on long days.
- Practice: do a full practice pack at home and time it—shaving minutes from routines gives more daylight for miles you want.
| Section | Items | Why it works |
|---|---|---|
| Bottom | Sleeping bag, pad, dry sack | Keeps insulation dry and centers low weight |
| Core | Food, stove/canister, shelter | Stabilizes load near your spine |
| Top & Lid | Tent body, rain jacket, sleeping liner | Quick access for weather and camp setup |
| Sides & Pockets | Water bottle, snacks, map, phone | Easy refills and fast access on trail |
Conclusion
Every ounce you drop adds more joy to time on trail and less sweat between camps. Trim what you can, but keep core safety items and a clear plan for emergencies.
After each trip, write a short didn’t‑use list and do a quick review of your gear. That list becomes the best tool to refine your kit and to spot items you can remove on future trips.
Use this article as a living list you consult before backpacking trips. Update weights, celebrate small wins, and trust your own balance. When ready, share a mini review with friends — we learn fastest together and make every trip better.
