
I still remember the morning we nearly missed a sunrise because we fussed over lost socks and an empty water bottle. I learned the hard way that a pre-packed day bag makes departures calm and quick. Now I keep a second backpack set ready: water, snacks, a basic first aid kit, and layers that fit our changing plans.
On busy trail days I use paper maps plus saved app maps in case cell service fails, and I always carry a charged phone and ID. Typical kid-friendly snacks work better than elaborate meals: fruit leather, jerky, cheese sticks, granola bars, and a tiny treat for motivation.
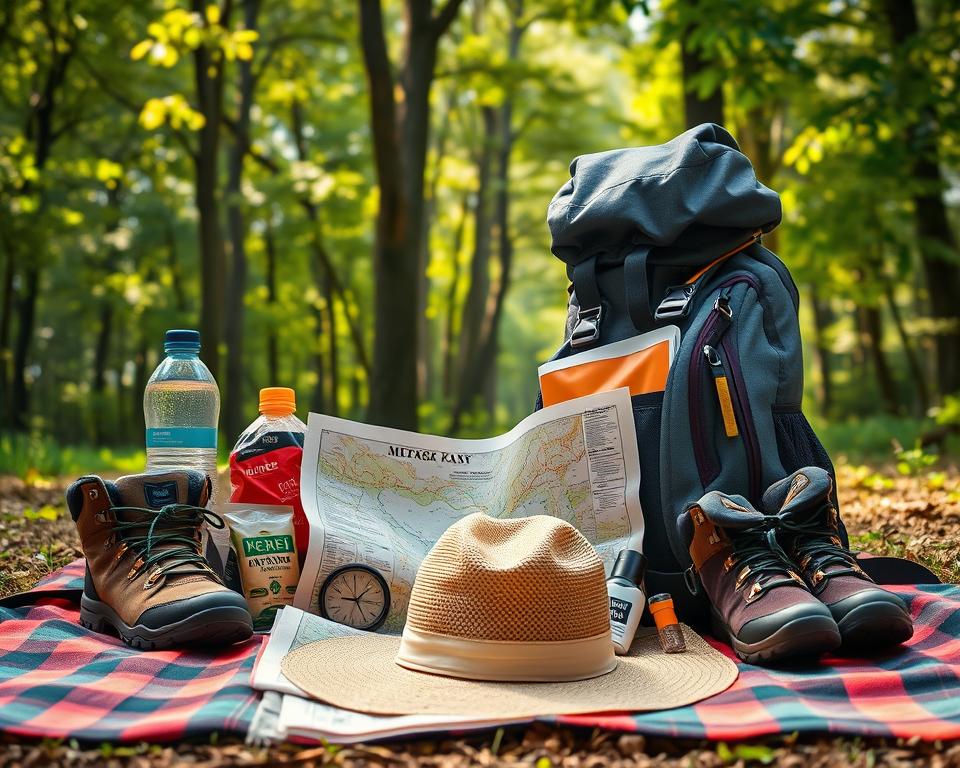
This short post may contain notes about favorite packs like Osprey Daylite and REI Traverse 32, and it may contain affiliate mentions that contain affiliate links. My goal is practical: a packing list that keeps your family safe, light, and happy on the trail.
Key Takeaways
- Keep a pre-packed day bag for faster departures.
- Carry water, snacks, layers, and a small first aid kit every trip.
- Save app maps and bring paper backups at the trailhead.
- Choose kid-tested packs and soft carriers for tired legs.
- Pocket a charged phone, ID, and a simple treat for motivation.
Read this first: notes, safety, and our affiliate disclosure
We learned early that a short safety routine makes every family outing smoother and safer. Spend a few minutes before you leave and you’ll save time on the trail and reduce stress mid-hike.
This post may contain affiliate links. If you buy through those links, we may earn a small commission at no extra cost to you. We only mention gear we use and trust, and recommend items that have worked with our kids and our day trips.
- Quick safety check: text a friend with the trail name, which trailhead you’ll use, and expected return time.
- Keep your phone charged but don’t rely on service; bring a paper map or download your route so you’re covered off-grid.
- Pack a light rain layer for each child even on clear days—mountain weather can flip fast.
- Keep essentials high and handy in the day pack: snacks, water, wipes, a small first aid kit, and a headlamp.
- Start small. Short, happy outings build confidence quicker than long slog days.
Teach simple rules before you go: basic trail etiquette, sunscreen and hat use, and a plan if someone gets separated (stop, stay put, blow a whistle three times).
Day pack basics: how to set up a family hiking day pack
A simple ritual—one stocked pack—is the secret that keeps our family outings calm. Keep a second set of essentials in a dedicated backpack so it is always ready. That saves time and stress on busy mornings.
For adults, choose a light, breathable backpack with a hydration sleeve and waist/chest straps. The Osprey Daylite or Packlite works well for everyday day use. Swap up to an REI Traverse 32 when winter layers or extra gear are likely.
Choosing small packs and hydration options
Young children (about ages 3–7) do well with a small hydration pack. They sip as they walk and avoid fishing for bottles. From mid-elementary, 12L–18L daypacks hold layers and snacks without overloading them.
- Keep core items in one ready bag: first aid, headlamp, wipes, sunscreen, lip balm, bug spray, and small trash bags.
- Clip hand sanitizer outside and stash two or three carabiners for jackets or covers.
- Use zip pouches for first aid, clean-up, sun/bug items, and navigation so you can grab what you need fast.
| Pack | Best use | Age / Capacity |
|---|---|---|
| Osprey Daylite / Packlite | Everyday family day use with hydration sleeve | Adult / 10–20L |
| REI Traverse 32 | Roomier option for winter gear or larger loads | Adult / 32L |
| REI 12L / 18L, Osprey Daylite Kid’s | Children’s comfortable daypacks and hydration packs | Kids / 12–18L (hydration for ages ~3–7) |
After each outing, refill water and restock snacks. That simple step means your pack is ready for the next trip. Label each backpack with name and phone, and run a quick pre-hike checklist together: water, snack, layer, whistle.
what to pack for kids hiking: the core list you’ll actually use
On our busiest mornings I make a quick checklist that keeps the whole family moving out the door. Use a short, practical packing list that fits in one small pocket or the top of the backpack.
Water and hydration essentials
Bring bottles your children will sip from: insulated Thermoflask or a Nalgene for colder days, or a hydration bladder for easy swigs while walking. Add a small electrolyte mix on hot outings.
Trail snacks kids actually eat
Mix carbs and protein: fruit leather, jerky or beef sticks, single-serve nut butter, cheese sticks, and granola bars (Zbar, Larabar, RXBAR). Toss in a tiny treat for motivation on steeper sections.
Sun and weather protection
Apply mineral sunscreen before you leave. Pack SPF lip balm, brimmed hats, and a light rain shell or jacket even on calm mornings.
Navigation and light
Carry a paper map plus a downloaded map app. Stash one headlamp per adult or per day pack in case the hike runs late.
Clean-up and Leave No Trace must-haves
Keep sanitizer, wet wipes, tissues, and small trash bags handy. Dog-waste bags are great for packing out used wipes and wrappers.
- Comfort extras: sit pad, small towel, 1–2 carabiners.
- Top-of-pack essentials: snacks, bottle, wipes, sun items.
- Quick trailhead check: water, snacks, hat, sunscreen, map, headlamp.
| Option | Best use | Notes |
|---|---|---|
| Insulated bottle (Thermoflask) | Cold drinks, long holds | Keeps water cool; kids prefer cold sips |
| Nalgene | Durable day use | Lightweight and simple |
| Hydration bladder | Hands-free sipping on the move | Good for older kids who can sip reliably |
Hydration done right: bladders, water bottles, and how much to bring
Early trips taught me that how you carry water matters as much as how much you bring. Picking the right system makes a long trail feel easier and keeps everyone in better spirits.

Hydration bladder vs. water bottle for young hikers
Bladders shine when children sip often without stopping. The hose clips to a strap and cuts down on pauses while on the move.
Water bottles are simple to clean and share. Insulated options like a Thermoflask 32 oz or Nalgene keep drinks cold and stand up to rough use.
- Many families carry both: a bladder for steady sipping plus a spare bottle for refills or electrolytes.
- Check bite valves on small bladders and keep the hose secured so it does not leak.
- Teach kids to take a sip every 10–15 minutes; make short “water breaks” into a game.
How much water to bring
Use a baseline of about 0.5 liters per child per hour in warm weather and double that in hot or steep conditions. On a short, cool hike you can bring less, but always start full.
| Option | Best use | Notes |
|---|---|---|
| Hydration bladder | Hands-free sipping | Good for steady intake on long hiking day |
| Insulated bottle | Cold drinks, durability | Thermoflask or Nalgene; easy clean |
| Filter bottle | Refill on route | Great when safe water sources exist |
Store extra water low in the pack for balance and dry bladders and bottles overnight to avoid stale tastes.
Food that fuels: kid-friendly hiking snacks and simple lunch ideas
A handful of reliable bites has earned us more smiling miles than any trick or toy. Keep snacks simple, familiar, and near the top of your backpack so you can hand them out fast.
Build snack breaks into the day: aim for something small every 45–60 minutes. Quick-grab items that work well are fruit leather, jerky or beef sticks (CHOMPS), single-serve nut butter, granola bars like Zbar or Larabar, and cheese sticks that stay intact.
Pack a couple of whole fruits such as clementines for hydration and a sweet hit. For lunch, try bagel sandwiches, a tortilla with nut butter and honey, or cheese and crackers. Tiny treats—few gummy bears or a lollipop—help on steep sections.
On hot days add a salty item and remind everyone to sip extra water. Store nut items sealed and separate when allergies are a concern. Always bring an extra snack—delays happen, and extra food keeps energy steady.
| Snack | Why it works | Packing tip |
|---|---|---|
| Fruit leather | Light, no mess, sweet energy | Keep in outer pocket for quick access |
| Jerky / CHOMPS | Protein-rich, long-lasting | Wrap in crush-proof pouch |
| Clementines | Hydrating and easy peel | Pack whole; place near top of bag |
| Granola bars (Zbar, Larabar) | Compact carbs + protein options | Double-wrap fragile bars to avoid crumbs |
Clothes and layers: dressing kids for changing trail weather
A quick layering routine has saved several outings from early cutoffs by cold or rain. Layers let you add or shed warmth as effort and weather change. That small habit keeps the day moving and lowers melt-down risk.
Start with breathable, quick-dry shirts and light mid-layers. Avoid cotton; choose polyester, nylon, wool, or bamboo blends that dry fast. A light insulated jacket plus a compact rain shell and packable rain pants handle most surprises without bulking up the day pack or backpack.
Dry feet matter. Bring an extra pair of socks and swap at the first sign of dampness or hotspots. Wool or double-layer socks like Smartwool or Wrightsock cut blisters on longer hikes and new shoes.
Even on mild days, tuck a thin beanie and gloves into a bright stuff sack. Wind on ridgelines chills quickly and often ends hikes early. Add a UPF long-sleeve and a brimmed hat for sunny stretches; sun shirts keep skin safe and children cooler than repeated sunscreen alone.
| Item | Why it helps | Packing tip |
|---|---|---|
| Light insulated jacket | Warmth without bulk for cool mornings | Compress into top pocket or stuff sack |
| Packable rain shell & pants | Keeps water out in sudden showers or brush | Store near top of day pack for quick access |
| Extra socks (Wool / double-layer) | Prevents blisters and keeps feet dry | Swap early; keep sealed in plastic bag |
| Thin beanie & gloves | Blocks wind and retains heat on exposed trails | Label and stash in a bright sack to avoid loss |
Sun, bugs, and ticks: protect their skin and comfort
A bright day can flip fast when sun and bugs join forces, so a short habit protects comfort and mood. Put sun and insect items in an outer pocket so you will actually use them during a day on the trail.
Mineral sunscreen, SPF lip balm, and sun hats
Apply mineral sunscreen at home and carry a small tube for reapplication. Don’t forget ears, neck, and the backs of hands.
Keep an SPF lip balm handy in an outer pocket; kids ask for it more when it’s easy to reach. Brimmed hats and sunglasses cut glare on bright rock or open ridgelines.
Bug spray, permethrin-treated clothes, and head nets
On buggy sections use a Picaridin-based spray on exposed skin; it smells mild and works well. Treat shirts and pants with permethrin before the season to cut ticks and mosquitoes without repeated spraying on the trail.
In heavy mosquito zones, a lightweight head net over a cap is an easy, effective barrier.
- Do a quick tick check at home after every hike—waistbands, behind knees, and hairlines.
- Pack a small anti-itch cream for bites and keep sprays in a sealable pouch inside the backpack.
- Reapply sunscreen every 80–120 minutes depending on sweat, water, and weather.
Maps, headlamps, and whistles: navigation and communication essentials
Good navigation starts with simple habits and a little practice before you head out. Many trailheads have weak or no cell service, so plan for offline options and a paper backup in case your phone loses signal.

Paper maps, saved app maps, and service realities
Always carry a paper map for the trail and save an offline app map (AllTrails or similar) while you still have signal. Snap a photo of the kiosk map as a quick pocket reference before leaving the parking area.
Keep the map in a zip bag in an outer pocket of your backpack so it is easy to reach when energy dips and you need a short check-in.
- Keep one headlamp in every adult pack; a late return is easier with a light ready.
- Clip a whistle to each child’s shoulder strap and teach the three-blast emergency signal.
- Pause at every junction and confirm your route together — trace junctions with a finger and match signs to the map.
If you use GPS tracks, verify they match the current paper map and any trailhead notices about closures. Teach children to stop, find a visible spot off the trail, blow their whistle, and wait if separated.
Finally, bring a small power bank near the top of the day pack if you rely on your phone for photos or maps. For a practical guide on prepping young explorers, see how we prepare your kids for their first adventure at prepare your kids.
Mini first aid and emergency kits for families
A small, well-organized kit has saved our hikes more than once when a scraped knee could have spoiled the day. Keep a compact pouch near the top of your backpack so you can reach it in a hurry.
First aid kit essentials for scrapes and blisters
Build a kit around real trail problems: cuts, scrapes, hot spots, splinters, and bites. Include waterproof bandages, blister pads, disinfectant wipes, tweezers, gauze, and a short roll of wrap.
Add a tiny tube of antibiotic or anti-itch cream and child-safe pain relief after you check with your pediatrician. Tuck a small morale treat like a lollipop in the pouch; it works wonders.
Emergency add-ons that weigh little but matter
- Whistle, emergency blanket, compact rain poncho, and a tiny match or lighter kit.
- Water treatment tablets, a pocketknife or multi-tool, and a small roll of duct tape.
- Store items in bright pouches and place blister care on top for fast access.
| Item | Use | Where to store |
|---|---|---|
| Tweezers & wipes | Splinters and cleaning | Top pocket of pack |
| Blister pads & bandages | Hot spots and cuts | Outer pouch of day backpack |
| Foil blanket & poncho | Emergency warmth and rain | Compressible inside |
| Water tabs & whistle | Make water safe; signal help | Small sealed pouch |
Optional gear by age: who carries what, and when
Gear choices that fit growth make outings smoother across the years. This short guide helps you match loads and roles by age so each child feels useful without getting weighed down.
Toddlers to early elementary
For ages about 3–7 you often carry the main load. A tiny hydration pack is fine if the child likes sipping, but comfort comes first.
- Use a soft carrier (Beco, Kinderpack, Trail Magik) when legs tire.
- Keep frequent breaks, snacks, and a familiar water bottle within reach.
- Clip a whistle on straps and plan nap-friendly routes with reward spots.
Elementary and up
Many elementary-aged kids enjoy a 12L–18L backpack. Let them carry a layer, water, snack, and a small first aid pouch.
- Keep load light—about 10% of body weight or less.
- Trekking poles help balance on rough trail and boost confidence.
- Teach safe use of a small pocket tool for older children and review rules at home.
- Reassess each season and let them help choose the gear they carry.
| Age group | Good option | Why |
|---|---|---|
| Toddlers–preschool | Soft carrier | Comfort and rescue when legs quit |
| Early elementary | Kids hydration pack | Steady sipping and light responsibility |
| Upper elementary | 12–18L backpack | Own layer, snack, water, small first aid |
Packing strategy by trail, weather, and time of day
A quick review of route, weather, and daylight saves a lot of mid-hike guessing. Match what you carry with distance, exposure, and when you will be out. Small choices cut weight and worry.
Short local hikes vs. longer remote hikes
Short neighborhood outings need basics: water, snacks, sun and bug protection, a small first-aid pouch, and a paper or downloaded map. You can travel light on familiar paths.
Longer or remote hikes require more planning. Add headlamps, an extra warm layer per child, an emergency blanket, and water treatment tablets. Tell a friend your route and expected return time.
- Plan hydration around heat, exposure, and distance; bring more water than you expect.
- In cold weather or strong wind, add hats, gloves, a puffy midlayer, and a shell that blocks gusts and rain.
- Wet forecasts call for rain pants and an extra pair of socks per child — dry feet often save a day.
- Bug-heavy zones: carry a Picaridin spray and consider Permethrin-treated clothes or a head net.
| Hike type | Must-have | Extra |
|---|---|---|
| Short local | Water, snacks, map | Small first aid |
| Long remote | Headlamp, extra layer | Emergency blanket, water tabs |
| Cold/wet | Hats, gloves, socks | Rain pants, shell jacket |
Conclusion
Small habits—like checking a water bottle and slipping an extra sock in a bright pocket—keep outings calm and happy.
Start with a short packing list: a full bottle or bladder, real snacks, sun and bug items, a map, a tiny aid kit, and a light layer in the backpack.
Let older children carry a small pack or their own carrier. Ownership builds confidence and makes hiking kids eager for the next trip.
This post may include affiliate links; if you buy through them we may earn a small commission at no extra cost. Use the printable checklist, keep a ready bag, and plan your next two hikes now.
Get outside, try the list, and share your favorite hiking tips so we can all improve together.
