
Have you ever wondered how a small receiver can point you to a mountaintop with feet-level accuracy, and when a phone will do the job versus a dedicated device?
I write as a hiker who tests gear and shares simple, practical steps to plan, follow, and record hikes. This short guide explains how the satellite system works: your receiver listens to signals; it does not transmit. Modern chipsets fit in phones and handheld units. Typical accuracy is about 6–16 ft with newer multi-band units.
Bring a paper map and compass as backups because batteries and screens can fail. I’ll show what features matter on trails—durable builds, readable screens, and a compass or altimeter. You’ll also learn offline maps, waypoints, track-back tools, power tips for multi-day trips, and how to export simple route files.
Key Takeaways
- Receivers listen to satellites; accuracy is in feet, not inches.
- Phones work for day hikes; dedicated devices help on multi-day trips.
- Always carry a paper map and compass as a backup.
- Use offline maps and waypoints to stay oriented without service.
- Keep spare power and know how to export route files (GPX).
What GPS is and why it matters on today’s trails
On a trail, a small receiver and a handful of satellites work together to show where you are with surprising precision.
The system is a satellite-based radio network. Satellites broadcast L-band signals that pass through clouds, fog, and light foliage. Each signal carries timing and orbit information.
Your device measures how long a signal took to travel at the speed of light. That travel time turns into distance. By comparing distances from several satellites, your receiver computes a position on the map.
- It works without cell service, so you can check your location on remote trails.
- Receivers only listen; they don’t transmit, which keeps things simple and private.
- Consumer units and phones give about 6–16 ft accuracy in good conditions.
- Reliability matters more than lab numbers—trees and canyons can weaken signals.
| Device type | Typical use | Strength |
|---|---|---|
| Smartphone | Day hikes, casual tracking | Convenient, built-in apps |
| Handheld unit | Multi-day, remote routes | Stronger reception, longer battery |
| Multi-band units | Technical routes, search | Better position stability |
My tip: use the device you have, but learn how sky view and timing affect fixes. Pick open spots to confirm a location when the trail squeezes into cliffs or dense trees.
GPS vs GNSS: the satellite systems that find your position
Mixing satellite systems and multiple signal bands keeps your location steady when the sky gets crowded by trees or cliffs. In simple terms, GNSS is the umbrella name for all global constellations — not just the original GPS.
What GNSS includes and why more satellites help
GNSS pools signals from GPS (USA ~33), GLONASS (~27), Galileo (~30), and BeiDou (~27), plus regional systems like QZSS. More satellites in view means your receiver sees better geometry.
That matters on trails. When trees or canyon walls block part of the sky, extra satellites keep fixes steady. Many modern devices use several constellations automatically, so you get reliability without fiddling with settings.
Multi-band signals: L1, L2C, L5 and real-world accuracy
Multi-band means a receiver listens on more than one frequency (for example L1 + L5). Newer signals like L2C and L5 reduce atmospheric errors and cut interference.
- Multi-band gives cleaner data and fewer dropouts under cover.
- It often shows up as tighter track lines, not just smaller numbers on a screen.
- Expect a small extra power draw, but noticeably better stability on twisty routes.
| Constellation | Satellites (approx.) | Why it helps |
|---|---|---|
| GPS | 33 | Wide coverage, mature signals |
| Galileo | 30 | Improves position stability |
| BeiDou | 27 | More satellites in view worldwide |
Bottom line: aim for multi-GNSS and multi-band features when you want real reliability on the trail. It’s a practical upgrade to accuracy and consistency in the field, not just a spec-sheet win.
How your device turns satellite signals into a location
Think of the sky as a network of clocks — your device reads those clocks to map your spot.
Each satellite broadcasts precise time stamps. Your receiver compares those time stamps to its own quartz clock and measures how long each signal took to arrive. Those travel times convert into distances that the unit uses to locate you.
Signals, time, and trilateration in simple terms
With three good signals the receiver estimates a surface position. The process is trilateration — overlapping spheres meet at your feet, not triangle math.
Why a fourth satellite helps elevation and time sync
A fourth satellite fixes elevation and corrects tiny clock errors. Satellites carry atomic clocks, so even millisecond time shifts make large distance mistakes. The extra satellite cleans up time and improves altitude readings.
- Think of each satellite as a clock in the sky; the unit reads them and measures distance.
- More satellites let the receiver compare combinations and pick the best solution.
- Multi-band signals cut ionospheric delay, helping real-world accuracy and elevation.
If your altitude jumps, move to open sky and give it a minute to average fixes. That simple habit often stabilizes the information and makes the readout trustworthy.
gps navigation for beginners: core concepts you need first
Knowing a few simple terms turns confusing readouts into usable trail information. I’ll define each item with a short, practical example so you can use your unit confidently.
Fix, accuracy, and reliability explained
A “fix” is when your receiver has enough satellite signals to compute a position. If fixes are steady, your track looks smooth on the map.
Accuracy is the radius of uncertainty around that point. Consumer units typically show about 6–16 ft in open sky, so expect a few yards of wiggle room.
Reliability is how stable that accuracy stays while you move. Multi-GNSS and multi-band units keep position readings steadier in trees and canyons.
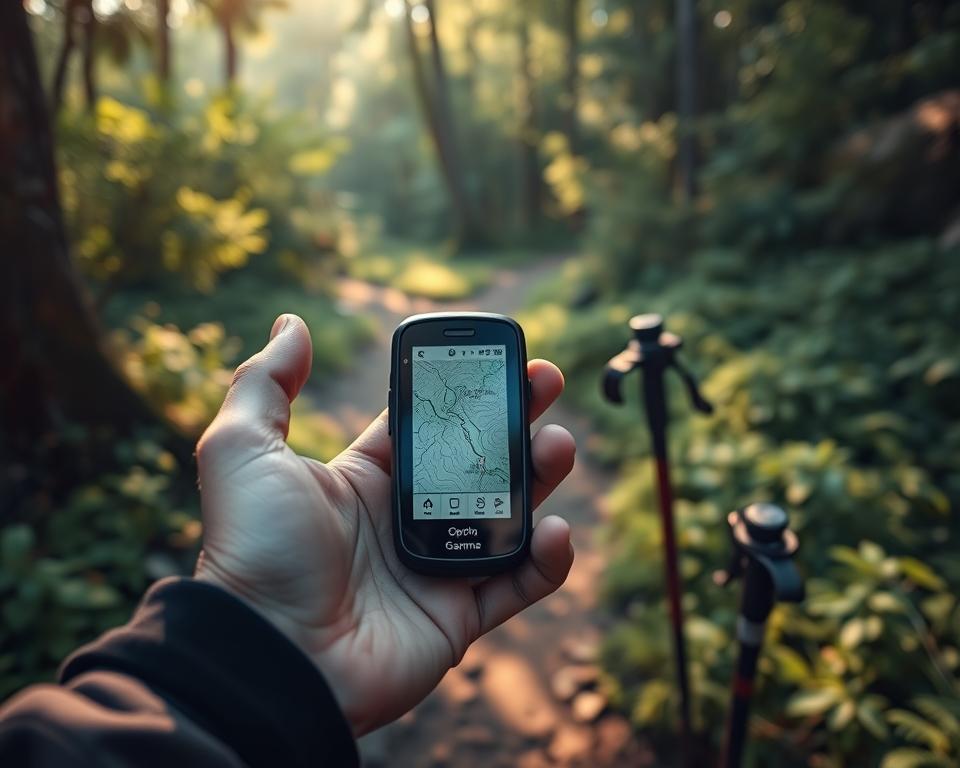
Waypoints, routes, and tracks: the basic building blocks
Waypoints are saved points like a trailhead or water source you can navigate back to later.
Routes are planned lines or sequences of waypoints used to follow a path between junctions.
Tracks are the breadcrumb trail your device records as you hike. Use “track back” to follow that trail back to your start.
| Term | What it is | Real-world tip |
|---|---|---|
| Fix | Computed position from satellites | Pause in open sky to get a clean fix before a steep descent |
| Waypoint | Saved location | Name camps and water sources clearly (e.g., Camp-Stream-N) |
| Track | Recorded path | Record tracks on unfamiliar trails; use track back to return |
Phones vs handheld GPS units: choosing the right device
Deciding between a phone and a dedicated handheld comes down to conditions, trip length, and how much gear you want to carry. Both devices can get you where you need to go, but each has clear trade-offs.

When a smartphone with an app is enough
If you stick to marked trails and short day trips, a phone with offline maps often covers your needs. Download maps on Wi‑Fi and test them in airplane mode before you go.
Phones are great for planning, photos, and sharing tracks. Watch out for capacitive screens in heavy rain or when wearing thick gloves.
Why a handheld GPS can be better in rough conditions
Dedicated handheld gps units shine in bad weather, cold, or remote terrain. They offer rugged builds, glove-friendly buttons, and longer battery life.
Many handhelds take replaceable batteries, run multiple days with spares, and include topo features and multi-band support. Carrying a power bank and a paper map plus compass remains smart no matter which option you choose.
- Phone: light, multi-use, ideal for fair-weather day hikes.
- Handheld: rugged, longer runtimes, better in cold or wet conditions.
- Carry: small power bank and paper map/compass for redundancy.
Maps and apps that work offline on the trail
Offline maps save trips when a connection drops; a quick prep step prevents surprises. Plan at home, download full map areas, and verify they open with airplane mode on your device.
Download and verify before you go
Choose an app or unit that supports true offline mapping, not just temporary caching. At home, download the exact regions you’ll hike and then test them in airplane mode.
Caching can fail at tile edges or after restarts, so treat it as a fallback. If your software relies on caching, open the entire route at max zoom before you leave.
Topo scale, file size, and storage tips
For off-trail detail, use 1:25k topo maps. For broader coverage use 1:50k. Higher detail and larger areas mean bigger downloads; check internal storage and use an SD card if available.
- Organize downloads by park or region to simplify updates.
- Sync routes from desktop planning tools to the app so your files stay tidy.
- Keep a small emergency map of the wider area in case plans change.
| Scale | File size | Best use |
|---|---|---|
| 1:25k | Large | Off‑trail detail, contour reading |
| 1:50k | Medium | Long routes, less detail needed |
| Regional | Small | Emergency backup, broad location awareness |
Accuracy in the real world: what affects your position
Signal reflections, sky clutter, and solar activity all chip away at real-world accuracy in ways that surprise many hikers.
Tree cover, canyons, buildings, and multi-path error
Dense trees and canyon walls can bounce satellite signals. Those echoes confuse timing and move your reported position by yards.
This multi-path error is common near cliffs, tall buildings, and heavy canopy. When echoes dominate, tracks look messy or jagged.
Space weather, atmosphere, and satellite geometry
The ionosphere and troposphere bend signals, and solar storms make things worse. Low satellites near the horizon pass through more atmosphere and add error.
Poor satellite geometry — when satellites cluster in one part of the sky — reduces solution quality. A wide sky spread improves accuracy.
WAAS and SBAS: free corrections you should enable
SBAS services like WAAS send orbit and timing corrections to your device. Turning it on usually tightens fixes, with only a small power cost.
- Move to open sky and wait a minute for the receiver to settle.
- Face the clearest view of the sky to reduce reflected signals.
- Enable WAAS/SBAS when available to improve location accuracy.
- Save waypoints at visible landmarks when reception is good.
- Expect foot-level accuracy on trails; sub-meter needs special gear or RTK.
| Error source | Effect | Quick fix |
|---|---|---|
| Multi-path (reflections) | Jumpy tracks, shifted position | Move to open area; re-take fix |
| Bad satellite geometry | Drift, reduced confidence | Pause and wait for different satellites |
| Atmosphere / solar activity | Elevation jumps, noisy track | Check app status; use waypoints and map cross-check |
Power and battery life: making your device last for days
You can squeeze hours of extra life from your device with a few simple habits and the right spares. Start by treating power planning like food planning: top up fully, preload maps, and test gear at home.
Practical power-saving steps
On the trail, most drain comes from the screen and constant position fixes. Use a low-power mode and dim the backlight to save hours.
- Preload maps on Wi‑Fi so you don’t download outdoors.
- Increase track interval (1s → 10–15s) to stretch battery life with little loss of detail.
- Turn off Wi‑Fi and Bluetooth unless you need them; disable extra sensors.
- Carry a compact power bank and test charging cables before you leave.
- In cold weather, keep devices close to your body; warm batteries hold charge better.
Battery options and field notes
| Battery type | Typical runtime | Best use |
|---|---|---|
| Rechargeable pack (USB) | 8–20 hours (depends on capacity) | Day trips and top-ups |
| AA (alkaline) | 6–12 hours | Handhelds, easy to resupply |
| AA (lithium) | 12–30 hours | Cold weather and multi‑day use |
Key features to look for in a GPS unit
Pick features that match the terrain you visit and the conditions you expect. A practical checklist saves buyer’s remorse and keeps you on the trail.
Screen type, durability, and waterproof ratings
Transflective screens remain readable in bright sun. Resistive touch or physical buttons work with gloves and in rain. Capacitive screens can struggle when wet.
Aim for IPX7 or higher and MIL‑STD 810 drop resistance. Sturdy casings and tight battery doors reduce failures in bad weather.
Compass, barometric altimeter, and sensors
A 3‑axis magnetic compass gives accurate headings while you stand still. A barometric altimeter smooths elevation data and tracks real ascent better than GPS-only readings.
Memory, SD cards, and storage
High‑detail topo maps and satellite layers need space. Choose a unit with ample internal memory and an SD slot. Map bundles bought with the unit often save money.
- Consider overall size and weight so the device sits in a shoulder pocket.
- Check battery door and port durability—these fail first in wet conditions.
- Look at mounting options if you bike or paddle; secure mounts protect the device.
| Feature | Why it matters on trail | What to look for |
|---|---|---|
| Screen | Readability in sun and wet | Transflective + resistive or buttons |
| Durability | Survives drops and storms | IPX7+, MIL‑STD 810 |
| Sensors | Stable heading and elevation | 3‑axis compass, barometric altimeter |
| Storage | Holds topo and satellite maps | Internal memory + SD support |
Connections and files: from Bluetooth and WiFi to GPX
Moving route files between a phone, a handheld, and a computer is one of the simplest ways to keep trips organized. A clean routine saves time and avoids waypoint mix-ups.

Importing and exporting GPX and FIT files
Most units mount as a USB drive. Drag and drop GPX to the device’s “routes” or “import” folder for fast transfers.
Use GPX to move routes and tracks. Choose FIT when you need extra sensor data like heart rate and cadence.
Syncing routes, weather updates, and app connections
Pair the device with its companion app to sync routes, upload activities, and update firmware without a computer.
Enable Wi‑Fi at home to push planned routes and pull weather data before you leave. Turn off auto-sync on weak networks to save battery.
- Organize route libraries by region and difficulty so choices are quick on trail.
- Verify coordinate formats (DD vs DMS) between planning software and your unit to avoid errors.
- After a hike, export your track (GPX) to share or archive in your planning tools.
| Transfer method | Typical use | Tip |
|---|---|---|
| USB drive | Fast GPX drag‑and‑drop | Use clear file names and folders |
| Bluetooth / app | Quick sync & firmware | Pair at home, test small files first |
| Wi‑Fi | Weather and bulk uploads | Sync large data only on strong Wi‑Fi |
Test a full workflow at home: build a route, transfer it, follow it, then export the track and review. Keep a small “must-have” folder on the device with key local routes in case cloud sync fails.
Faster startups and better locks: A-GPS and EPO/CPE files
A short sync at home can turn a long cold start into an instant lock at the trailhead. Assisted fixes preload orbit and correction data so your receiver doesn’t have to read slow downlink info from satellites.
I update assistance files over Wi‑Fi or via my phone before long trips. Many devices fetch EPO or CPE files automatically when paired. That means quicker time to first fix and a small savings in battery use while the unit searches.
- A‑GPS preloads satellite orbit info so the unit locks faster when you go outside.
- Look for settings labeled EPO or CPE and sync them on Wi‑Fi before travel.
- After long travel or long downtime, assistance data cuts initial wait and helps position build faster.
- Faster startups reduce idle drain—good when you want to save power for the hike.
- If privacy matters, you can disable assistance, but expect slower cold starts.
| Type | Primary benefit | How to update |
|---|---|---|
| A‑GPS | Quicker first fix | Sync via companion app or Wi‑Fi |
| EPO/CPE files | Shorter cold start, small power savings | Download periodically, especially after travel |
| Manual refresh | Fixes slow acquisition | Restart device and step into open sky |
Quick tip: combine assistance with multi‑band support and a clear sky view for the snappiest, most stable position. If your device feels slow, a one‑minute restart in open space usually rebuilds a clean fix.
On-trail navigation basics: using waypoints, routes, and track back
A short routine at the trailhead makes navigation calm and reliable. Load your planned file, glance at key turns, and note three landmarks you’ll pass. This small step stops simple mistakes from growing into long detours.
Following a route line and staying on course
Keep the route line visible on your screen and zoom in near junctions. On ridgelines or open sections, zoom out to keep the big picture.
If you drift, stop and compare your position arrow to the line. Small corrections are easier than long backtracks.
- Load the route and skim key junctions before you hike.
- Zoom in at complex spots; zoom out for broad context.
- Save a waypoint at water sources, camps, and tricky turns.
Track back and breadcrumb trails when you’re unsure
Start track recording at the trailhead so you leave a breadcrumb trail. Most devices let you “track back” to retrace those points to your start.
Use the compass page to confirm heading while stopped; a 3‑axis compass removes heading wobble when you’re still. A barometric altimeter helps match contour lines and elevation points on the map.
| Tool | Use | Quick tip |
|---|---|---|
| Route line | Follow planned path | Keep visible and check junctions |
| Track back | Retrace your recorded path | Record from trailhead, use when unsure |
| Waypoint | Anchor key spots | Save water, camp, and tricky turns |
Cross-check the map with terrain: streams, saddles, and contour shapes should match. In poor visibility, slow your pace and lean on waypoints and the compass more often.
Practice these steps on a short local loop so the workflow feels natural before longer trips. I use this routine every time; it keeps position errors small and stress lower on the trail.
Health and performance data on the trail
Monitoring how hard your body works on a climb helps you pace smarter and feel better at the end of the day. Modern wearable devices link physiological data to your route so you can learn from each trip.
Heart rate sensors and why they matter
Heart rate is an easy, reliable gauge of effort. Staying in an easy zone on long climbs conserves glycogen and delays fatigue.
Wrist optical sensors are convenient, but chest straps usually give steadier heart readings during bouncy hiking or cold weather.
Cadence, power, and other activity tracking features
Cycling-style cadence and power sensors detail mechanical effort. Fast packers and bikepackers use them to measure efficiency and pacing.
Many devices record these metrics into a FIT file that joins your track. Sync via Bluetooth to apps that show trends, recovery, and sleep data.
- Use heart rate alerts to avoid burning out early on climbs.
- Pair sensors at home to prevent troubleshooting at the trailhead.
- Export FIT when you want route + metrics; use GPX to share just the path.
- Review post-hike trends to fine-tune nutrition and pacing on future trips.
| Metric | Why it helps | Tip |
|---|---|---|
| Heart rate | Pacing and endurance | Use zones and alerts |
| Cadence | Rhythm and efficiency | Monitor on steep or technical sections |
| Power | Objective effort (cycling/fast hikes) | Combine with heart data for best insights |
Troubleshooting poor signals and odd readings
If your readout seems unreliable, start with calm, practical checks. Small steps often clear the issue quickly and keep you safe on the trail.
Quick, stepwise fixes
Step into open sky and hold still for 30–60 seconds so the receiver can average a clean fix. This reduces reflections and blockage from trees or cliffs.
Restart the device and resume recording; many odd behaviors clear after a reboot. If the track is wildly off, stop the current recording and start a new activity.
- Verify offline maps are present — a missing tile can look like bad position data.
- Switch to a lower-power mode or dim the backlight if the device is overheating.
- Enable WAAS/SBAS to tighten fixes when available; it costs a little battery but helps.
Advanced checks and maintenance
At home, check software and chipset updates — past releases have fixed accuracy bugs. Recalibrate the compass and barometric altimeter after travel, battery swaps, or major weather shifts.
Open the satellites/status page to see which satellites are in view and whether the unit lists any interference. Rarely, interference or outages affect fixes; cross-check with landmarks and use track back to return safely.
| Action | When to use | Expected result |
|---|---|---|
| Move to open sky | Chunky trees or canyon | Cleaner signals, steadier position |
| Restart device | Odd behavior or frozen screen | Clears temporary faults |
| Update software/chipset | Persistent errors after restart | Improved stability and fixes |
| Recalibrate sensors | After travel, battery swap, weather change | Accurate heading and elevation |
Conclusion
A few steady habits turn devices into reliable partners on the trail.
Start simple: set up offline maps, learn waypoints and routes, and practice on a local loop. A phone with an offline app covers most day trips, while rugged handheld gear helps in long, wet, or cold outings.
When you upgrade, choose units with multi‑GNSS and multi‑band support, WAAS/SBAS enabled, a 3‑axis compass, and a barometric altimeter. These options improve real-world fixes more than flashy extras.
Keep gear updated and charged. Carry a small power bank, a paper map, and a compass as backups. Label waypoints clearly and load routes at home to save time on trail.
Use this guide as a checklist, tweak your setup with experience, and enjoy more confident, smoother hikes. See you out there with clean lines and steady fixes.
